|
About Us
Middle School
Elementary School
Preschool
Current School Families
Support Our School
Visit Our Church
|
October: Microsoft Word
Drawing Tool
It's time to create your own Comic
Strip using the Drawing Tool in Microsoft Word.
- Start Microsoft Word and save your document as:
YOUR NAME - Comic Strip
- Change the Page Orientation (under File / Page
Setup) to Landscape. Change the Top, Bottom, Left & Right
Margins to .75 and click the OK button.
- Is your Drawing Toolbar on the bottom of the
Word window? If not, click on View / Toolbars / Drawing to get it to
display.
- Using the Rectangle on the Drawing Toolbar, draw a box into your document.
- Double click on the box you just created. On the Size tab change the size to 2.5 inches for both the
height and the width.
- Copy and paste the square you created 5 times. Do you know how to
do this?
- Click on the square
- Then click on the Copy Icon in the
Standard Toolbar; the Copy Icon looks like 2 sheets of the paper and
is located just to the right of the scissors.
- Then click on the
Paste Icon in the Standard Toolbar 5 times; the Paste Icon looks
like a clipboard with a piece of paper on top and is located just to
the right of the Copy Icon.
- Move your squares around to create 2 rows with 3 boxes in each row
and align the boxes to the right of the page by moving them into
position.
- Double click each square and change the Fill Color for each square
in the Color and Lines tab. Save your work - just click on
the Save Icon located on the Standard Toolbar; it's the one that
looks like a floppy disk.
- Now, it's time to name your comic strip. To create your name:
- Insert Word Art (a link to Word Art is included on the Drawing
toolbar) and format your text the way you would like.
- Then,
on the Word Art Toolbar, click the icon that has Ab to the side and down.
This will make your title vertical instead of horizontal.
- Resize the
title as needed and move it to the left of your boxes.
- Save your work!
- Add pictures to each of your boxes to tell your story by clicking
on the box and adding either clip art (click on the man in the
Drawing toolbar to access clip art) or drawing a picture using the
Auto Shapes tools on the Drawing toolbar. Each box
needs at least one picture that relates to the theme of
your comic strip. If using clip art, resize as needed to fit inside the
boxes. It's okay if part of your picture extends outside the box in
some cases. And, save your work!
- Now, it's time to add the dialogue to your comic strip.
- Click on
Auto Shapes on the Drawing Toolbar
- Then click on Callouts to select an
appropriate speech or thought bubble for each of the boxes in your
comic strip. The Cloud Callout is commonly used in comic
strips.
- Size each callout to fit correctly inside each box (or
extending outside the box where appropriate) and pull the
yellow diamond on the callout toward the character who is thinking
or talking.
- Callouts work just like text boxes so once each callout
is sized correctly just type in it to add your text. You can change
font styles, font sizes, colors, etc.
- And, it's
time to save your work again!
- Add a Text Box to the bottom right-hand side of the page. Select the white box with the little “A” in it from the
Drawing Toolbar at the bottom for this. Center your text and using
any readable font that you wish enter the following data into the
text box:
- Line 1 - Your First & Last Name
- Line 2 - Today's Date
- Line 3 - Your Grade
- Save your work!
- If there's time, create a small logo for yourself using multiple
Auto Shapes from the Drawing Tool. For example, if you wanted to
draw a face you could:
- Use the circle in Auto Shapes to draw a large circle.
Hint: If you draw a circle while holding the shift key, it will
be a perfect circle rather than an oval.
- Using the circle again, draw 2 small circles for eyes and a
small circle for a nose.
- Add ears using 2 additional small circles. Click on each ear
and then click on Draw and then on Order and then on Send to
Back to put the ears behind the head shape.
- Draw a mouth using the moon shape. Then click on the rotate
tool on the Drawing Toolbar and rotate it so it looks like a
mouth and move it into position.
- Add hair using the lightning bolt or the scribble tool or any
other drawing tool you'd like.
- Double click each part that you drew and add color, gradients,
etc.
- Once you have all the "parts" done, you should group
them together by clicking the main part (the head in this
example) and then holding the shift key and clicking the other
parts. Then click on Draw and Group. Now you can resize and move
your "logo" as a single item.
- Save & print your comic strip!
Here's a sample strip
Note: This uses the same clipart in all boxes due to the content.
Your comic should use different pictures in at least some of the boxes.
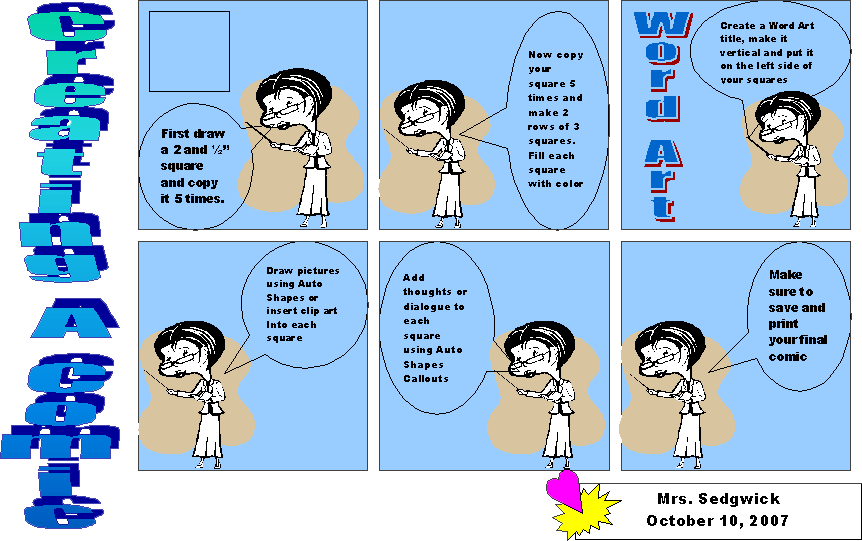
Click comic to see a larger version
Back to Computer
Lab: October - Word
|

